
Revenge of the Recycling System
~Project 3~
Overview
Our team was challenged to design a mechanism that lifts a hopper containing recycled waste, code the Q-bot (a modified Roomba with an Xbox Kinect on it) to move along a track using colour sensors, and dispose of the recycled waste into a bin.
The premise of the project was to create a concept design of how we can improve managing waste in the real world.

Q-Bot with trash - Source: P3 Project Module
What I have learned
Below are some takeaways I have learned throughout this project as part of the modelling sub-team...
Personal Takeaways
Throughout the project, I learned the following:
-
how to fabricate parts using a 3D printer and laser cutter
-
improved my 3D modelling skills in Inventor
-
developed my collaboration skills as both the modelling-sub team and the computing-sub team had to work together to ensure the trash was disposed of
-
refined my communication and leadership skills by ensuring my modelling-sub team partner knew the task at hand and assist him if necessary
-
and improved my interviewing and professionalism skills as our team had to elaborate the design and demonstrate how everything works
Skills Developed
-
Inventor
-
PrusaSlicer
-
Fabrication
-
Leadership
-
Collaboration
-
Interviewing
-
Professionalism
-
Communication
Design Process
Below is the design and coding process of our recycling waste design...
Objective, Constraints, and Problem Statement
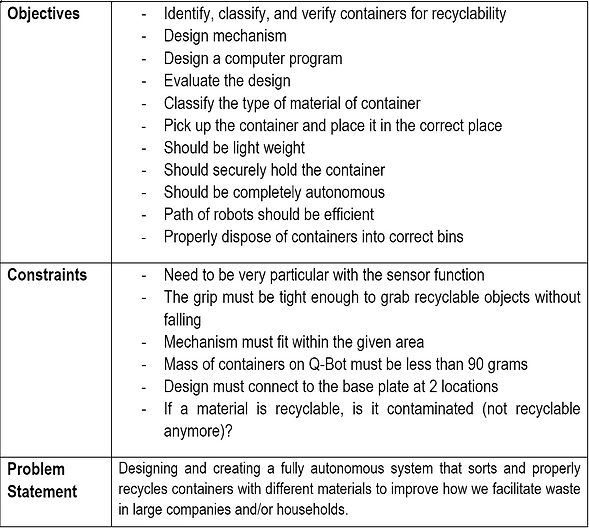
Before starting any project, making a table of objectives and constraints is a great idea as you can look back to see your goals and list out any requirements.
Creating one also helps guide our goals in the right direction and achieve the best results.
Instead of adding functions, we added a problem statement to remind us why we are doing this project. However, we should still have added a functions row to list how the device will operate.
Modelling Process -
Model Team
Idea Gathering Process


Absolom De Vera and Lingjie Su Concept Sketches
Click to see the photos and know how each design works...

Decision Matrix: Choosing which design is best
We, the modelling sub-team, created two concept sketches, one for:
-
Linear Actuator
-
Rotary Actuator
After debating amongst ourselves and using a weighted decision matrix, we believed that the first design was best as it ranked the highest in the matrix.
I believe that creating many concept sketches are important as it provides the opportunity to elaborate ideas and discuss with peers on what can be improved, which is what we did.

List of benefits for Linear and Rotary Actuator
In addition, we created a list of benefits of both actuators to help us decide which actuator we wanted to use throughout the project.
The modelling sub-team decided that using a rotary actuator is the best choice as more benefits were listed than linear actuator.

Lingjie Su Final Concept Sketch: Lowered Position

Absolom De Vera Final Concept Sketch: Raised Position
Design Improvements/Sketches + Design Thoughts

Original design concept sketch

Improved design
After talking to some peers, they suggested that using a stick to lift the hopper up would snap as it would not be able to support the load of the hopper with trash on it. So, I changed the stick design to a rectangular-triangle prism shape, known as "the pusher piece," ensuring that it can withstand such loads.
Also, instead of using a ball joint, I replaced it with a hinge as peers suggested that it would be difficult to fabricate or find a ball joint and implement it into the design. Using a hinge was a much simpler alternative.
Press the arrows to see more of the design changes...
Final Design


The 3D models of the final components of the design.
Do not forget to click on the photo or the arrow to see more

Laser Cut Pieces

All Parts: Laser Cut Pieces + 3D Printed Parts
The mechanism is designed such that:
-
It lifts the hopper efficiently
-
It is creative
-
Mass is minimized
-
It is lightweight
In addition, the pusher piece was laser cut to save time fabricating the parts and withstand greater force. Acrylic was used when laser cutting, which is stronger than 3D printed parts because acrylic is a solid piece, whereas 3D printed parts have many defects and is not 100% completely infilled, meaning there are a lot of holes/hollow areas within the part.
Skills Applied
-
Inventor
-
PrusaSlicer
-
3D Printing
-
Laser Cutting
Final Result
This is a short video demonstrating how our mechanism works.
Coding Process - Computing Team
Storyboard + Flowcharts
Storyboard of Program
Before starting a program, starting with a storyboard or flowchart is wise as it ensures the programmer to understand what needs to be achieved.
In addition, it guides the programmer along the right path towards a great and successful program.
The following slides are flowcharts of the program, helping our computing sub-team create their program.
Press the arrows to see more...

Storyboard of the program...
Choosing Sensors
In lab, we build a small car with an ultrasonic and light sensor. We then tested both sensors to see how they worked.

Car fully built by team
Car moving using light sensor
Car moving using ultrasonic sensor

To ensure that the computing-sub team knew what sensors to use, they used a decision matrix.
The two best sensor options were either ultrasonic or colour sensors.
Ultimately, colour sensors were used throughout the project for the following reasons:
-
Can detect the different coloured objects that are going to be sorted and recycled
-
Can associate a colour to the type of container, e.g., blue for clean plastics
-
Q-bot can follow the coloured lines on the floor
Decision Matrix of all possible sensors
Final Result
This video demonstrates how the code works.
Positive Learning Outcomes
Some major takeaways from doing this project was improving my Inventor and collaboration skills. I learned many techniques in Inventor, such as creating gears, that can help me 3D model in future projects. In addition, I helped my group mate, ensuring that he was on the same page as I and assisted him if he got stuck.
Failures/ Ways I can Improve
One of the biggest mistakes I made was not trusting my group mate that well with completing tasks. Putting more faith and trust in his skills could have resulted in contributing brighter ideas that can improve the design.
Miscellaneous
If you are interested in seeing our team's finalized design report or milestones we have overcame, click the button...
Project 4 - Krystal Klear
Click the button below to see project 4