
Get a Grip
~Project 2~
Overview
Our team was tasked with designing a container that can house a specific surgical tool and coding a robot arm that picks up and transfers containers into their appropriate autoclave, making medical treatment easier to perform and accessible for people who live in rural areas.
What I have learned
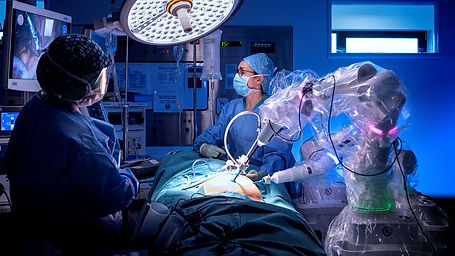
Robot Arm Surgery - Source: Google Images
Below are some takeaways I have learned throughout this project...
Personal Takeaways
In conclusion, I developed my Python/coding skills since I was part of the computing team. For example, I correctly learned how to troubleshoot my code because I made many mistakes.
In addition, I further developed my leadership skills as I managed my entire team, ensuring that they understood the content, finished their work on time and encouraged everyone to try their hardest.
Finally, my interviewing skills and professionalism improved as we were interviewed about what we had done in our project.
Skills Developed
-
Python
-
Granta EduPack
-
Leadership
-
Team management
-
Interviewing
-
Professionalism
-
Communication
Design Process
Below is the design and coding process of our container design...
Objective, Constraints, and Functions
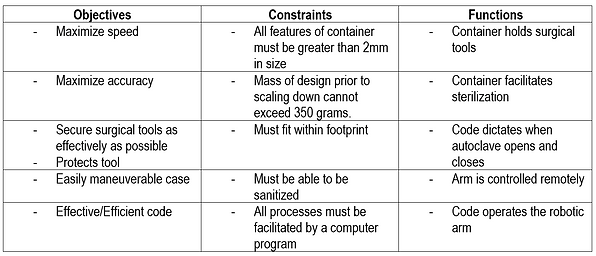
As a team, we created a table that lists our container's objectives, constraints, functions, and how the robot arm should perform.
This ensures that we all know precisely how to achieve the best results.
Modelling Process -
Model Team
Low Fidelity Prototype

Leo Blew's container design

Hamza Abbas' container design
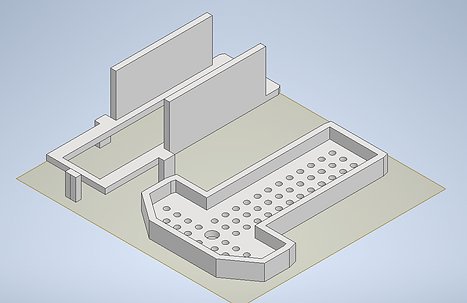
Above are two prototypes of our container that will house surgical scissors. It was designed to be secured and will allow steam through for sterilization once it is in the autoclave.
Final Inventor Model of the Container
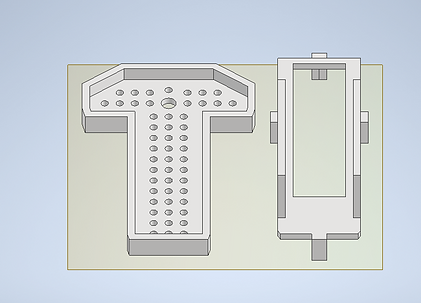
Leo Blew's Inventor container designs
This container is designed such that:
-
It can securely house surgical scissors as the left part with the large walls acts as a lid
-
It can be gripped and held by the robot arm as there are walls
-
It allows sterilization as there are holes and a rectangular hole in the lid
-
Mass is minimized
Coding Process - Computing Team
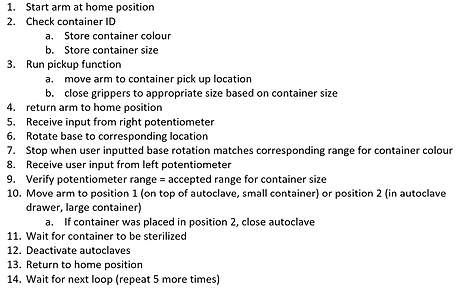
Flowchart


Above is a flowchart that I created, breaking down the steps required to accomplish the program.
Note: I had to split the flowchart because it was long.
Pseudocode
To ensure that our program is as efficient as possible and easy to create, we created a pseudocode outlining the high-level workflow of our computer program.
Pseudocode - Made by Computing Team
Improving Code

Omer Karo, one of my computing team members, thinking of a plan to improve the movement of the robot arm.

The plan that Omer came up with. We realized that the simulation environment was similar to a cartesian plane. As a result, we decided to implement trigonometry to move the robot arm. In the end, the robot arm was smooth and efficient.

We used a version of this code to ensure that different containers spawn randomly.
Material Selection


Skills Applied
-
Granta EduPack
Everyone on the team had to find the best material for the container using Granta EduPack. My objective was to choose a strong yet cheap material. Despite that Cast Iron ranks as the best material, I decided Low alloy steel instead because:
-
It has the best yield strength, which is worth paying a little extra (1034.5MPa - Low alloy steel vs 652.5MPa – medium carbon steel and 438MPa – cast iron)
-
As a result, the risk of damage to the container is reduced, minimizing maintenance - the key to minimizing cost.
-
The container will resist external forces a lot better.
-
Still relatively cost-effective
-
Tough, which prevents any fractures in the container when dropped into the autoclave or high pressures from the steam
-
It has excellent corrosion resistance properties
Final Results
Modelling Team


The three photos are the final 3D Printed model of our container.
-
Our entire team completed a test run using an actual robot arm. It successfully got picked up and dropped off into a bin, acting as an autoclave.
-
The two models could open and close, securing the surgical scissors.
Computing Team
This is a short video demonstrating how our code works in the simulation environment.
Skills Applied
-
Python
Miscellaneous
If you are interested in seeing our team's finalized design report or milestones we have overcame, click the button...
Project 3 - Recycling System
Click the button below to see project 3